...
Place the APM-3700 on a flat surface with the front of the kiosk facing you as depicted below. Insert the provided key (The larger of the 2 sets provided) into the lock located on the top left of the Kiosk’s front bezel. Set the lock to the “ON” position.
| Wiki Markup |
|---|
{| Advanced Tables - Table Plus |
|---|
:align=center|columnAttributes= | | style="text-align:center;",style="text-align:center;" | | align | center |
|---|
|
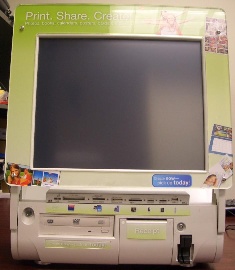 Image Added Image Added
|  Image Added Image Added
|
|
Step 2:
Carefully pry the front bezel cover from the chassis, working from left to right. No tools are required for this step as the design allows for its removal with just your bare hands. Four clips secure the bezel to the chassis. There are two markings (arrows) on the upper left and right corners of the bezel that show were the clips are located. Little pressure should be applied to the specified locations with clips, to free the bezel off the chassis as shown below:unmigrated-inline-wiki-markup
{| Advanced Tables - Table Plus |
|---|
:align=center|columnAttributes= | | style="text-align:center;" | | align | center |
|---|
|
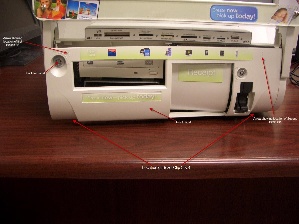 Image Added Image Added
|
|
Completely remove the front bezel and place it somewhere safe. Now that the bezel is removed that will leave the Optical Drive & Receipt printer tray exposed. Pull the tray out of the bay using the two silver tabs located at near the bottom of the Kiosk. A small amount of pulling force needs to be applied to free the tray our which is connected to a daughter board to the rear of the tray. The image below shows the location of the mentioned pull tabs, demarcated by the red arrows:
| Wiki Markup |
|---|
{| Advanced Tables - Table Plus |
|---|
:align=center|columnAttributes= | | style="text-align:center;" | | align | center |
|---|
|
 Image Added Image Added
|
|
Step 3:
The location of the Receipt Printer Controller board and DIP Switch that need to be changed is shown in the image below:
| Wiki Markup |
|---|
{| Advanced Tables - Table Plus |
|---|
:align=center|columnAttributes= | | style="text-align:center;" | | align | center |
|---|
|
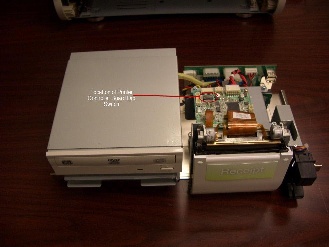 Image Added Image Added
|
|
Step 4:
a) Locate the Receipt Printer DIP switch (its location is in step 3) and enable lever 3, do so by sliding lever 3 to the “ON” position. Only Lever 3 and 8 should be in the “ON” position. An Image of above mentioned action shown below:unmigrated-inline-wiki-markup
{| Advanced Tables - Table Plus |
|---|
:align=center|columnAttributes= | | style="text-align:center;" | | align | center |
|---|
|
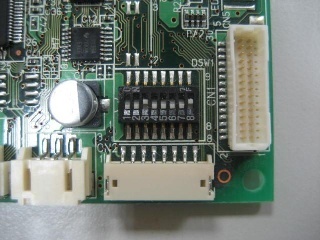 Image Added Image Added
| Lever |
|
b) From the Windows Start Menu navigate to “Start>>Settings>>Printers and Faxes”. Once the Printers and Faxes windows opens right click on the printer titled “Receipt”. This name maybe different on you APM if the drivers have been re-installed. “Receipt” is however the default name for your receipt printer if unchanged from your receipt of the Kiosk. Select the properties menu item after right clicking on Windows Start Menu Item described above. Navigate to the “Ports” tab in the Receipt printer properties. Highlight the port the printer is attached and should be the default checked port (COM5|Serial Port). Once the port is highlighted click the configure port button.
c) Enable Flow Control from the default selected option of None to XON/XOFF. Hit ok all the way out of the printer properties page after the change is made. See image below on mentioned setting:unmigrated-inline-wiki-markup
{| Advanced Tables - Table Plus |
|---|
:align=center|columnAttributes= | | style="text-align:center;" | | align | center |
|---|
|
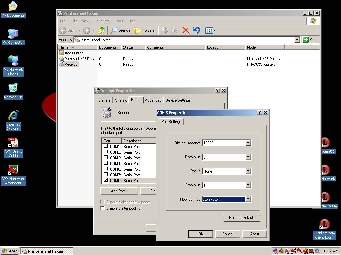 Image Added Image Added
| Click on Flow control from NONE to XON/XOFF |
|
Reverse Steps 2 and 1 to install the Optical/Receipt bay tray and Front Bezel.