Overview
You may need a product that uses content available from another product... such as, you have 5x7 flat cards enabled, but would like to offer them printed on cardstock at a premium price.
The Retailer-Side Setup
Example of when you need this: You want to offer cards that are different stock paper and at a different price but have them show all the Standard and IPI content! OK!
To be able to offer the same product (type/size) but alternate surfaces (and prices) online--- (no kiosk equivalent at the moment for this)
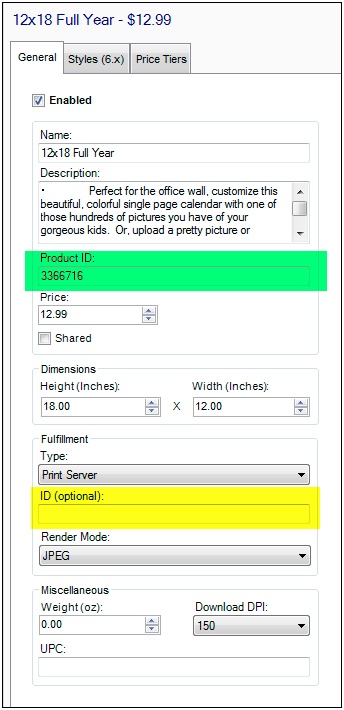
- In Lab 50 or myLab, look up the folio product you want to duplicate (like 5x7 flat card), jot down the Product ID.
- Create a new product (push Create New Product btn in upper left of Lab 50; ensure to set the 'Product Type' to be the same as the existing product) and in the Product ID box (green), copy in that Product ID from step 1.
- If you need it to print to a different channel or have different production settings than the originating product ID does, then assign a different ID for printing (yellow box). Use an ID in the 9000 - 9999 range, which are reserved for custom dealer products that we do not need to assign/reserve/be notified of. Pick an ID within that range and go with it (record what you are using so you don’t duplicate it later). You will need to add the product to your apmconfig_products_custom.xml file and then configure it for printing in the Setup Wizard. (instructions follow)**
- (Otherwise the ID from the green box will be used for printing---which is already a product so that is already in your products xml file, which tells the system where to print the product... this is fine if it prints to the same place the original one does.)
- Once you add your product, it's added to the All Products folder. Now, find the category where this new product should go(this would be in the folder with the small blue check mark icon), right-click and Add Product, then go find you new product. To zero in on it faster, check the Recents folder or the group where you put it when you defined it.
The Photo Finale Support Side Setup
When you have the products set how you'd like, let us know (support@photofinale.com). We have to run some magic on this side so that all the properties and content align properly. You may want to disable the products until we have done this part. Just tell us where the products are (please include the product ID) and we'll take care of the rest! If you'd like to screenshot the list from myLab that shows the 3 IDs and product names and all...that would be helpful.
Instructions for creating the apmconfig_products_custom.xml …
You only need to do this step if you want to handle the new product differently than you handle the original product (i.e. have it print on a different printer). And, you won’t have a custom products file unless you have created custom products previously. You need to create one…it looks like this (all new entries go between the
<products units="all"> and the </products> tags...and within the product line (where the width, height, etc. are...the order of those items do not matter)...just make sure not to remove the syntax. To check that you didn't screw up something, you should be able to open this file in a browser...if you have made any mistakes in syntax or formatting, it will show you where to fix.
<?xml version="1.0" ?>
<products units="all">
<product width="12000in" minheight="0" position="9000" height="12000in" description="12x12 12-Month Calendar" id="9000" minwidth="0" package_type="calendar"/>
</products>
- In Notepad (or better, Notepad++), open apmconfig_products.xml (located in C:\Program Files\Lucidiom Lab 50\Tools\PrintServer) and find the product you want to copy. Copy the line for that product line as well as the top two lines of the apmconfig_products.xml and the bottom line of the apmconfig_products.xml into a new xml file named apmconfig_products_custom.xml. It will look like this (where the red above is the product (or products) you have copied):
- Replace the ID and position code with the same ID in the 9000-9999 block that you used in the dialog box (the yellow highlighted box in the screenshot). The product ID and position code should use the same number. Don’t repeat a number you have already used.
- Save as apmconfig_products_custom.xml in the same folder location where the apmconfig_products.xml is located, which for a Lab 50 machine is C:\Program Files\Lucidiom Lab 50\Tools\PrintServer
- Configure as needed in Setup Wizard.